Have you ever wondered how to really track your visitors and not by using counters? How would you like to know where your visitors come form, or how long did they browse your blog? And lastly is, how's all that possible?
Luckily, all the questions that I've just mentioned above can be answered in two words: Google Analytics. So, what is Google Analytics anyway? It is simply a web-based application (owned by Google of course, hence the name
Google Analytics) that you can use to find out tons of information related to your site's visitors and traffic. Now, if you only own a personal blog like a diary of some sort, perhaps you wouldn't need to register for Analytics. It is more suited to be used by blogs which, as you might have guessed, earns tens and hundreds of visitors daily (like a tutorial blog, or software reviews). Nevertheless, it is totally up to you to decide whether or not to register for Analytics. Anyway, let's get started.
The first important thing is that you must already own a Google account. For most Blogspot users, this is not a problem; your Google account is the one that you use to login to your dashboard.
The next step is to open
www.google.com/analytics, then after the page has loaded, click on the 'Sign up Now' below the big blue 'Access Analytics' button. You should be prompted to login, enter your Google account email address and password and hit Sign Up.
After signing up, your next task is to register your blog URL. If this is your first time registering a URL, you should see a box and a 'Sign Up' button; well, click on that and you'll be presented with a page to enter your blog's detail. Fill that page correctly, and for the 'Account Name' box, you can type a short account description like 'My blog' or 'Blogging Tutorial blog'. After you're done, hit the Continue button.
The second page will require you to enter your personal detail, fill it thoroughly and proceed to the next page. This page contains the code to put in your blog, for now, just copy it. It will look similar to this:
<script type="text/javascript">
var gaJsHost = (("https:" == document.location.protocol) ? "https://ssl." : "http://www.");
document.write(unescape("%3Cscript src='" + gaJsHost + "google-analytics.com/ga.js' type='text/javascript'%3E%3C/script%3E"));
</script>
<script type="text/javascript">
var pageTracker = _gat._getTracker("UA-xxxxxx-x");
pageTracker._trackPageview();
</script>
Now go to your blog's dashboard and choose Layout > Edit html. Use your browser's find function (for Firefox press ctrl+f) to search for </body> in the code. After you've found it paste the code directly before it. It'll look something like this:
<script type="text/javascript">
var gaJsHost = (("https:" == document.location.protocol) ? "https://ssl." : "http://www.");
document.write(unescape("%3Cscript src='" + gaJsHost + "google-analytics.com/ga.js' type='text/javascript'%3E%3C/script%3E"));
</script>
<script type="text/javascript">
var pageTracker = _gat._getTracker("UA-xxxxxx-x");
pageTracker._trackPageview();
</script></body>
Save your template. Now you need to wait a few hours for the code to work. After a while, sign in to your Analytics account to see the details of your visitors. Here's a screenshot from my own account:
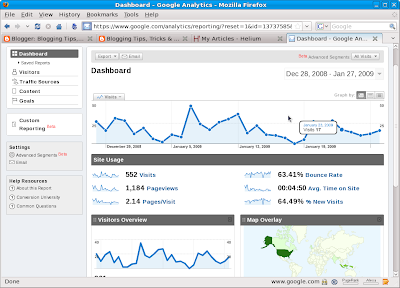
This article will not explain about how to use Google Analytics, and that's because it is too complex to be explained in one short post. But feel free to comment if you want me to post tips or tutorials on Analytics.

 Click on the 'Select blogs to display' in the Privacy section. Another page will load and you should be able to un-tick whichever blog titles you would like to hide. Don't worry, the blog will still be there, but it will no longer appear in your public profile page. You can change your mind anytime by going back to this page and re-selecting the hidden blogs.

