Showing posts with label Blogging Tips. Show all posts

Monday, February 16, 2009

Tips to increase blog traffic

Does your blog lacking traffics? Here are simple tips you can use to significantly increase your traffic. Some of the tips in the list are either based on my own experience or researched from the 'Net. Ready? Here we go:

  1. Participate in conversations – What I mean by conversation could be as simple as a comment to a mailing list. For starters, comment on other’s blog and leave your URL in the comment. You can also participate in discussion forums. Try to join the Google Blogger group or Bloggerforum, and under every post you made, leave your blog URL there. This technique is proven to be very effective to kick-start your traffic.
  2. Write good contents – I know that this is an *ancient* trick, but it still works, believe me. By writing many good stuffs, people WILL come back to read more. 3-5 posts per week is ideal to grab traffics, but that depends on what you are writing about. If you are reviewing automobiles, 1 post per week is enough. But if you are blogging about the local news in your state, I would recommend 5-7 posts per week, as news is always updated fast.
  3. Reply to reader’s comments – When a reader leaves a comment at one of your post, MAKE SURE THAT YOU REPLY IT! This is very important to build trust between you and your readers. They wouldn’t want their comments to be ignored. And besides, people will come back to your blog to see if the comment have been answered or not. If not, the chances are that they wouldn’t want to come back for a second time.
  4. Shorten your feeds – This little tip, although frequently underestimated, could give quite a boost to your traffic. How it works is actually very simple. When you write a new post, be it only two or three paragraphs, the readers who followed you will only see the ‘excerpt’ of it, and to read it fully they will have to visit your blog. Simple right? For Blogger users just go to Dashboard > Settings > Site Feeds, and choose ‘Short’ in ‘Allow Blog Feeds’.
  5. Allow readers to bookmark you – Put a button that could let your readers to Digg you, or to save your blog in their Delicious bookmark. Buttons like ShareThis works well with blogs. People will be able to see you and hopefully visit it.

Well, that’s all for now folks. Hopefully this small tips could give a boost to your traffic, but one thing for sure: it won’t happen overnight. You must work hard for it. I’ll post more of these soon, so stay tuned!

Wednesday, February 4, 2009

Dangers in changing blog URL

Changing your blog's URL may be the stupidest thing you can do, especially when you have gained some readerships (that is, visitors). Ok, in today's tip let me shortly outline the dangers of changing your blog address. I urge myself to write this article when I realized that many of our fellow bloggers have unconsciously made this mistake.

First thing first, why would someone change their blog address? One main reason is that they did not plan their blog properly from the beginning. For example, they made their blog in 2008 and use the URL 'blablabla2008.blogspot.com' (only example!) and suddenly they found out that today is already 2009! So will do they do? In order to keep their blog 'up-to-date', they'll change the URL to 'blablabla2009.blogspot.com'.

Now imagine that the owner have worked very hard to get visitors, and let's say that the blog gets 200-300 visits a day. Many people are following and have bookmarked the blog. They like to visit the blog daily because it is always up-to-date (remember, it's only an example). Suddenly, the blog is no longer accessible! And when they try to open 'blablabla2008.blogspot.com', Blogger will only return the Blog not Found page!

After a few days, the unknowing owner of the blog did not see any more comments nor followers appearing in the blog. And guess what? He has just lost all his visitors! It's pretty terrifiying and I'm quite sure that you won't like it if that happens to you.

Another danger lies within search engines' result page. As you already know, when you click on one of the search results, you'll be taken to that specific page. And say that someone click on the URL 'blablabla2008.blogspot.com/2008/01/article' because they found it is related to what they are searching for. Without the need to think, you'll spontaneously know that the page no longer exist! That means that the owner of the blog has just lost some potential visitors from search engines. This may not be much, but imagine if it is 3 visitors a day, it will result in 1095 visitors lost at the end of the year!

All in all, changing your blog URL is a risky thing to do. My suggestion to you is the usual phrase 'think before you act'.

Sunday, February 1, 2009

Create a Quiz for visitors

Are you tired of the default polls that doesn't do any good? Or is it better to make something like this?


Interested? Just follow the steps given below:
  1. Firstly, you must have a Quibblo account, as this quiz uses their service. If you do not have an account yet, go to www.quibblo.com and click on the 'Become a member' link at the top right of the page. After you register, you'll need to confirm your email address.
  2. Login with your email and password to access your personal Quibblo page. Then put your cursor on the top of the 'Create a Quiz' tab, but don't click it yet. A list of option should appear, and for now just select 'Scored Survey' (you can try the different types later).
  3. In this page you can create your questions and answers. It'll look similar to the screenshot below:
    Fill in the Quiz title with the title of your quiz, and fill in a short description of it in the Introduction box. For now just ignore the "Upload an Image for Your Quiz Title". In the Quiz Question section, fill in your questions and answers. Use the 'Add an Answer' button to add more answers to one question, and thus making it tougher. If you want more questions, use the 'Add Another Question' button. After you're done, hit Continue.
  4. The next page will require you to fill in the details about your new quiz. Fill in all the blanks, and if you do not want this quiz to appear in the Quibblo's list of quiz, don't forget to click on the 'Advance Option' and ticking the 'Don't list this quiz on Quibblo.com' checkbox. Click on 'Preview my quiz' to continue.
  5. After you are satisfied with your new quiz, hit the 'Create my quiz' button. In the next page find the HTML code for the quiz and copy it. Now go to your Blogger Dashboard > Layout > Add a Gadget and choose html/javascript. Paste the copied code there and hit Save. You are done, and just go back to step 2 if you would like to create another quiz. Have fun!

Friday, January 30, 2009

Remove unwanted blogs titles from your profile

In this short tutorial, we'll try to customize our blog titles that appear in our profile. What's the point of this? Well, if you own several blogs would like to keep some of them private, you can hide it. Imagine if your private blog that is only shared to your best friends was found by the public because of that link that appears in your profile page. How embarrassing is that? One more reason, it is better to hide the 'under construction' blogs until they are ready to be viewed by others. This will invoke a professional image of you, as nobody will caught you with an unfinished blog.

Ok, let's get down to the steps. First of all login to your Dashboard. Then click on the 'Edit Profile' on the right of your photo, and you should be presented by a page to edit your public profile. It'll look similar to the screenshot below:

blogging tips tutorialClick on the 'Select blogs to display' in the Privacy section. Another page will load and you should be able to un-tick whichever blog titles you would like to hide. Don't worry, the blog will still be there, but it will no longer appear in your public profile page. You can change your mind anytime by going back to this page and re-selecting the hidden blogs.

N0te: to really protect your private blogs from unwanted visitors, see my other tutorial here.

Wednesday, January 28, 2009

Registering for a Google Analytics account

Have you ever wondered how to really track your visitors and not by using counters? How would you like to know where your visitors come form, or how long did they browse your blog? And lastly is, how's all that possible?

Luckily, all the questions that I've just mentioned above can be answered in two words: Google Analytics. So, what is Google Analytics anyway? It is simply a web-based application (owned by Google of course, hence the name Google Analytics) that you can use to find out tons of information related to your site's visitors and traffic. Now, if you only own a personal blog like a diary of some sort, perhaps you wouldn't need to register for Analytics. It is more suited to be used by blogs which, as you might have guessed, earns tens and hundreds of visitors daily (like a tutorial blog, or software reviews). Nevertheless, it is totally up to you to decide whether or not to register for Analytics. Anyway, let's get started.

The first important thing is that you must already own a Google account. For most Blogspot users, this is not a problem; your Google account is the one that you use to login to your dashboard.

The next step is to open www.google.com/analytics, then after the page has loaded, click on the 'Sign up Now' below the big blue 'Access Analytics' button. You should be prompted to login, enter your Google account email address and password and hit Sign Up.

After signing up, your next task is to register your blog URL. If this is your first time registering a URL, you should see a box and a 'Sign Up' button; well, click on that and you'll be presented with a page to enter your blog's detail. Fill that page correctly, and for the 'Account Name' box, you can type a short account description like 'My blog' or 'Blogging Tutorial blog'. After you're done, hit the Continue button.

The second page will require you to enter your personal detail, fill it thoroughly and proceed to the next page. This page contains the code to put in your blog, for now, just copy it. It will look similar to this:
<script type="text/javascript">
var gaJsHost = (("https:" == document.location.protocol) ? "https://ssl." : "http://www.");
document.write(unescape("%3Cscript src='" + gaJsHost + "google-analytics.com/ga.js' type='text/javascript'%3E%3C/script%3E"));
</script>
<script type="text/javascript">
var pageTracker = _gat._getTracker("UA-xxxxxx-x");
pageTracker._trackPageview();
</script>
Now go to your blog's dashboard and choose Layout > Edit html. Use your browser's find function (for Firefox press ctrl+f) to search for </body> in the code. After you've found it paste the code directly before it. It'll look something like this:
<script type="text/javascript">
var gaJsHost = (("https:" == document.location.protocol) ? "https://ssl." : "http://www.");
document.write(unescape("%3Cscript src='" + gaJsHost + "google-analytics.com/ga.js' type='text/javascript'%3E%3C/script%3E"));
</script>
<script type="text/javascript">
var pageTracker = _gat._getTracker("UA-xxxxxx-x");
pageTracker._trackPageview();
</script></body>
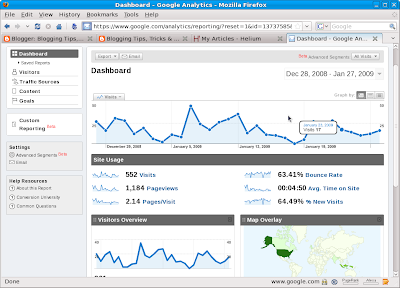
Save your template. Now you need to wait a few hours for the code to work. After a while, sign in to your Analytics account to see the details of your visitors. Here's a screenshot from my own account:

Analytic TutorialThis article will not explain about how to use Google Analytics, and that's because it is too complex to be explained in one short post. But feel free to comment if you want me to post tips or tutorials on Analytics.

Monday, January 26, 2009

How to make a private blog

Ok, so what I mean by private blog is a blog that can only be viewed by you, or just a group of selected people. What for? Well, by restricting your blog readership to only a few people, you can share some secrets without worries. Now, I already knew that some of you can do this by yourself, but for the benefit of all others, please bear with me. Anyway, I'd said that this blog is for newbies :)

Let's get going with the steps. First is of course to login to your Dashboard. Then, hit Settings under your blog's title. On the Settings page choose and click the Permissions tab. You should see two sections in it, the Blog Authors, and the Blog Readers section. See screenshot below.

Permission TutorialIn the Blog Readers section, choose who else can view the blog other that you. If your blog has many authors and you wanted to make some sort of a private group, choose the 'Only blog authors' option. Or, if you prefer to select your readers by hand, then click on the 'Only people I choose' option. You must have their email address though. Choose 'Anybody' to revert back to the original setting, that is, all people can read your blog.

Well, that's all for now folks. But stayed tuned for more tips and tutorials.

Thursday, January 22, 2009

Have your blog been plagiarized?

This topic has become a serious issue nowadays. Really, you won't like all your hard work to be plagiarized, copied mercilessly just like that. But the thing that matters is that: How do we know that our blog has been plagiarized? I have been spending days looking for tools which we could use, but alas, I've found only a little. One tool that I always use to check for plagiarism is a search engine called Copyscape. This search engine allows you to type in your blog URL in the search box, and it will return a list of other sites who have the somewhat same content as yours.

Copyscape is a pretty well-known international site and if you mind the technical details, it has a PageRank of 7, and an Alexa Rank of 55,799. Don't worry if you can't quite comprehend what I said just now, just read on :).

Here is a screenshot of it:

For us normal users (that is, not premium), Copyscape only offer us a limited set of features. For example, if the specified web site has indeed been plagiarized, Copyscape will show us only a few of those site, usually about 10 sites, in the result page. To unlock its full potential, well, as you might have thought, we must PAY around $0.05 per search. This isn't much, but for casual bloggers like you and me, the free feature will suffice.

Tuesday, January 20, 2009

Windows Live Writer-write posts offline

‘I’ve known Windows Live Writer from a long time ago, but why bother using it?’ you ask. The answer is quite simple: While some of you are blessed with a full 24 hour a day internet connection, some of us may not be that lucky. In some (developing) countries, internet bills are not a set price. It costs several bucks per hour you use or per MB you download. So you see, the more time we spent typing posts on the Blogger’s editor, the more expensive your internet bill will become.

If you are in that condition, Windows Live Writer can save you a few dollars per month. You can type your post offline, save it, and then publish them the next time you get online. Take your time, you can spent several hours typing as many post as you like in the Live Writer, and publishing it all at once only in the matter of minutes.

Ok, enough talking for now and let’s get started with Live Writer. First of all, if you haven’t done so, is to download and install the Windows Live Writer. Download it at http://download.live.com/writer. After you finish installing it, run the application. If this is your first time launching it, you will be guided through the initial setup. Just follow the given instructions. You’ll need to provide your blog URL, email, and the password, and it will connect to your blog automatically. When you have finished the setup, you can just start typing. Here is a screenshot of the Live Writer when I am typing this post.

WLW

Now you can ‘blog your heart out’ as stated in the download page. Just remember, after you finished typing your post, you can either save it or publish it directly (click ‘Publish’ on the toolbar or press Ctrl+Shift+P). Oh, one more thing, you can setup more than one blog account in Windows Live Writer, just click ‘Blog > Add blog account…’ on the menu bar. Enjoy!

Saturday, January 17, 2009

Firefox Addons: ScribeFire

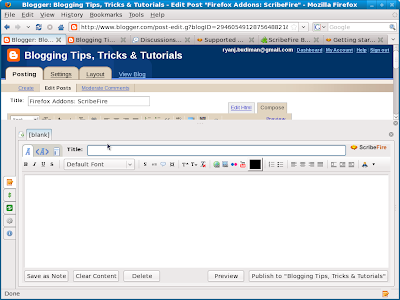
Any of you are currently using Firefox? Yeah, I know that Firefox is one of the best browser in the world (if not the best). But did you know that you can still extend it by installing the ScribeFire addon? I tumbled upon it today while browsing the Mozilla Addons archive. After a while I realized that this addon is definitely for us bloggers! It allows you to write new posts practically anywhere on the web, so it could save us some time. Just launch the addon, type your post in, and publish it, without even logging in to your dashboard! Here is a screenshot of it:


Ok, the first thing you do after installing it is of course, restart Firefox. After the browser have successfully restarted, press F8 or click on the ScribeFire icon on the status bar (the one like a notepad with a pencil). If this is your first time firing it up, you should be guided to sync ScribeFire with your Blogger account; enter your BlogSpot url and hit Next. Then finish the remaining steps. That's all, now you can start blogging anywhere just by clicking the ScribeFire icon.

Note: Thanks to Christopher Finke for creating this wonderful addon! I owe you one :)

Monday, January 12, 2009

Alternatives to Adsense

Are you one of Adsense's publisher who, like every other publishers these days, feels that Google didn't give you enough profit? Apart from increasing traffic, one thing you can try to increase your 'salary' is to use another ads afilliates company. You can use all the codes from all the different afilliates and see which one is giving you most profit. As I myself haven't tried all the afilliate companies in the world, below is a short list of my favorite companies:

Adbrite is one ads afilliate that is probably also well known beside Google Adsense. The rules in Adbrite are pretty much the same to Adsense, but it is known to give more tolerance especially to us bloggers; so you might as well give it a shot. Sites within the Adbrite network include some international websites, such as Yahoo! and eBay, and this is a prove that Adbrite will really pay you for your work (not a scam).

Text Link Ads may be quite an unfamiliar name to your ears, and it is because it hasn't done so many advertisings. But not to worry, because this program will give you monthly income eventhough there is not a single click done to their ads, really! Unfortunately, registering your blog is another thing, they only accept high quality websites. Their requirement includes having a minimum PageRank of 4 and a high volume of visitors daily (based on Alexa Rank). But once you got your blog accepted, raking dollars is a snap, you just need to link to the advertiser's site and keep the link valid for the whole month and BAM!... the money is yours. Note one thing: the higher your PageRank and the more visitor open your blog, the higher your income is. I've seen some PageRank 6 and 7 demanding around $200 to $350 a month for one mere link (imagine if they have 10 links at once: $3500)! Yes, this program allows you to set your own price, although it isn't a good idea to ask very high unless you got some popular blogs with you.

If you have any suggestions or want to add more to the list, feel free to comment on this post. Happy earning!

Disclaimer: I didn't wrote this to get all Adsense publishers to rebel; this post is written for informational purposes only.

Saturday, January 10, 2009

SEO Checklist (part 1)

Everyone wants to rank high in all search engine, and that is no longer a secret. To have your site sitting on the top of the search results IS a lot of hard work that usually takes years to accomplish. Now what I have here is a simple to-do list that could improve your site in search engine's eyes. If anyone is quite familiar with SEO, then you may have known some (if not all) of these onpage optimization:

1. IMPORTANT! The first thing you should do is to find yourself a targeted keyword on which you would like to optimize your blog. A simple example is when you have a cooking blog, don't optimize your blog for the search term 'food' because you'll be competing with millions of websites (my search in Google today for 'food' results in 856,000,000 sites, and that's quite a competition). Instead, opt for something like 'make your own dessert' which only results in 1,700,000 sites (compare that to 856 million...). Once you got a keyword or two, let's move on.

2. Make your title as short as possible while maintaining your targeted keywords. So 'Blogging Tips, Tricks, & Tutorials' is so much better than 'Many blogging tips that could make your blog looks nicer and attract more traffic to your blog'. Short titles will make each word in it be valued more by search engines.

3. Emphasize your keywords by bolding, italicizing, and underlining. Words like these: 'blogging tutorial' or 'blogging tips and tricks' will make it more noticable to search engines. Note that you must do this method in a normal (ordinary) way; you can't just bolden or underline every word in the sentence as this could be considered as a fraud/spam website trying to gain attention from search engines.

4. Using <h1> tag for your keywords can be a big boost. <h1> tag is a header tag. It can be considered as a tag to make the title of your blog or website. For those of you who are familiar with html, you sure can go through this step with no problem; but for those who doesn't, here's how you do it: type <h1>your-keyword-here</h1>. If I type <h1>Blogging tutorial</h1>, the result would be:

Blogging tutorial

Note that the most favorable place to put this is at the top of the page, like this blog (the big 'Tips, Tricks, and Tutorials' at the top is made using a text gadget with the <h1> tag).

5. Use your keyword sparingly; don't overload a page with so many of your keywords in unappropriate places (eg. one paragraph have more than 20 'cooking' keyword in it). Search engine will think that this site is a spam (again). Use it only when needed.
Well, that's all for now folks, but remember that part 2 is yet to come. So do your best with these right now but DO NOT expect to get the 1st position in search results all in a sudden. These tips are technically proven to raise your position but again it depends on how you implements it.

Stay tuned for part 2; subscribe to this blog or follow it for the best convenience.

Wednesday, January 7, 2009

Subscribe via email

Today's tutorial is on how you can let your readers subscribe via email (like that one on the right side of this page). What you need is simply one FeedBurner account; to register go to feedburner.com. Now let's begin.

If you had just created your account, you must now burn a feed first. (Feedburner users who already have their feed activated can skip this step.) To burn a feed, simply type in your blog URL in the provided "Burn a feed right this instant" box and hit 'Next'.

At this point, if you are a Blogspot user (which I assume you are), Feedburner will identify 2 (two) feeds on your blog, Atom and the RSS feed. You must select either one to continue; don't hesitate as it will make no visible difference. Click Next if you have finished deciding.

What you'll do next is to name your feed and also pick a URL. Fill in the first blank with your feed title, your blog title will suffice. Fill in your desired Feedburner URL in the second blank; keep it short as you don't want to confuse your readers. If you're done hit 'Activate Feed'.

You are done now and will be returned to your Dashboard. Click the feed that you have just created. You should see the statistic of your feed. To make people subscribe via email, click on the 'Publicize' tab, then the 'Email Subscription' link on the left side of the page.

After you hit the 'Email Subscription' link, click on the 'Subcription Management' link right below it. Now scroll down a bit and locate the html code for that feed. Copy it. Go back to your Blogger dashboard and click on Layout > Add a Gadget. Choose Html and paste the code you copy earlier. Position the gadget to wherever place you want and click on Save. Finished! You should now see the email subscription box similar to the one on this page :)

Tuesday, January 6, 2009

Other Blogger forums you might like

If you an active participant in the Official Google Blogger Group, then you might want to join more forums (maybe primarily to promote your blog). Some forums that I can recommend are:
Note that this list is still growing, feel free to comment and add more to the list.

Friday, January 2, 2009

Scheduling a Post

Scheduling a post is useful at certain time especially when you are going out for a long holiday, as it keeps your blog automatically updated, so your readers won't know you aren't at home.

Scheduling a post is simpler done than said, just type a new article, and in the 'Post Option' below the editor, type in the post's date and time. If you enter tomorrow or a few days later, Blogger will postpone the posting of the article until the specified time comes.

You can also use this date and time technique to order your post. See this tip: http://blogger-newbies.blogspot.com/2008/12/ordering-posts.html.

Thursday, January 1, 2009

Using Google to find keywords

Today's tips is about how you can quickly find keyword with their usage statistics. Simply put, open https://adwords.google.com/select/KeywordToolExternal (will open in a new tab), and type in any generic keyword that is the main topic of your site. For example, you can enter blog or blogging. Then type the confirmation code to make sure you are a human (really!) and hit Get Keyword Ideas. After a while you should be presented with a TON of keywords, each with their statistics.

The columns that you should be paying attentions to includes Advertiser Competition, Approx Avg Search Volume, and Approx Search Volume: (last month). Basically 'Approx Search Volume (last month)' and 'Approx Avg Search Volume' are pointing to the same data: how many times people search for that keyword. Generally, higher values means higher interest to that particular topic.

If you are an AdSense publisher, higher 'Advertiser Competition' means that you won't be running out of ads to display soon. On the other hand, it may also mean more competition for AdWords advertisers, and it might be difficult to get a good traffic, unless you pay more.


This tips is just an introduction to Google Keyword Tool, there's much more to it, depending on how you use the data, so good luck in optimizing it. And it is not the only keyword tool available on the net, so you might as well scour the Web and find other tools.

Tuesday, December 30, 2008

Merging Two Blog Account

Do you have two separate email addresses that are connected two blog? Maybe you aren't sure how to merge them. Well, one way is to make one address the admin of the two blogs. Read more for more details

Number 1 step you should do is to choose which email address you want to make it dominant (that is, the one that controls the two blogs). For example, say that I have two account, both have a blog attached to it. Let's just call it john.s@gmail.com and johnsmith@gmail.com. I want my johnsmith@gmail.com account to be able to control both the blog. After you decide then open up your Dashboard (with the account that you want detach your blog from, NOT the one that you choose just now, so in my case I login using the john.s@gmail.com) and click on the Settings tab, then choose the Permission subtab.

In the Blog Author section, the one with your email address there, click 'Add Authors' then type in your other email address (I should type johnsmith@gmail.com) and hit 'Invite'. Sign out from your Dashboard. Now check your email inbox if there is a mail (from Blogger) that says you are invited to be an author, click the confirmation link and follow the given step. Usually you have to login with your other account, so that's why I told you to sign out first.

Now back to your Dashboard > Settings > Permissions (still with the account you want to detach your blog from). If you do it right, then you would see both of your email addresses, one labeled admin and one author. Beside the label you should see a link called 'make admin' and click that.

Sign out from your current account and sign in (now I sign in with johnsmith@gmail.com) again with your another account. Now you should be able to administer both of your blog with that one account only. You are done for this part but if you want to remove your other account (in my case I want to remove john.s@gmail.com from being an admin), go to your Dashboard > Settings > Permission and hit the Remove link beside your email address.

If you have any technical difficulties, feel free to comment and tell your problem, I'll be very glad to help you out.

Widen your blog width

Are you kinda sick of the width of your blog? It can only hold that wide pics (usually 220px for sidebar). In this tutorial we'll learn how to make more space on your blog so that your pics stays in. NOTE: this tutorial is intended for those who use the default templates, if you use custom template then this tutorial is most likely not applicable.

Ok, so our 1st step is to open the Dashboard > Layout and choose the 'Edit html' tab. In the code, find the line:
#main-wrapper {
width: 474px;
margin: 15px;
This is taken from the Denim template, your's may have a slightly different code, depending on the template.

Now see there the width is (in my case) 474px, and I can't put any pic or videos that are wider than 474px. So how do we change it? Simple just change the width values to whatever size you want it to be. In my example I'll change it to 500 px.
#main-wrapper {
width: 500px;
margin: 15px;
Don't forget there's a semicolon at the end of px. Simple right? The code above changes the width of your blog posts, not the sidebar. If you want to change the sidebar width, then look for the following code:
#sidebar-wrapper {
width: 240px;
word-wrap: break-word;
overflow: hidden;
And change the width value to whatever width you wish. Ok, after you are done, Save the template.

Now after you finished editing your posts and sidebar width then it's time to edit the outer-wrapper. You'll need this to have the same width as the total of your post and sidebar. So go back in the edit html and find either:
#content-wrapper {
width: 985px;
margin: 0 auto;
padding: 0 0 15px;
OR
#outer-wrapper {
width: 985px;
margin: 0 auto;
padding: 0 0 15px;
And change the width by as much you change the sidebar or posts. Here's a practical way to do that. Say I've change the posts width by 35px, and the sidebar width by 20px, that means a total of 55px. My current outer-wrapper (or content-wrapper) width is 985px, so I must change it to 1040px (that is, 985 + 55). Save your template. You are done for this part.

Now if you got your header misaligned, you must change the width as you change the outer-wrapper. Find the code:
#header {
width: 985px;
margin: 0 auto;
And change the width by the same amount you change the outer-wrapper. Hit the Save button for the last time and you are done! Now you have a wider blog to hold all your pics. But if the width still doesn't fit you, go back to editing html until you find the perfect width. Keep experimenting!

Monday, December 29, 2008

Add random text gadget

Do you want to make a random, always-changing, text? Maybe its a quote of the day, or maybe it's a list of random tips. Anyway, let us begin.

First of all prepare your text. It is preferable to use not more than 3 sentences. After you do so open http://www.anniyalogam.com/widgets/random-message-widget in your browser. You should see a plain white site with many blanks to fill in. Now, fill in the 'Widget Title' with the title of your widget (quotes of the day, etc) and the rest 10 blank (that is, message 1, message 2, and so on) with your quotes/tips. Then hit the 'Generate Code' at the bottom of the page. The large box in the bottom should be filled up with Javascript code.

Your next step is to copy the code, go to your dashboard, click layout, and on the Page element tab click 'add a gadget'. Scroll down till you find the 'HTML' gadget. Hit the + button to add it to your blog. Then a window should pop up. Fill in the 'Content' with the code you copy earlier, hit 'Save' and position the gadget wherever it fits you. That's it, now you have a random text gadget!

Sunday, December 28, 2008

Increase traffic by submitting blog to directories

Here's another great tip to increase your blog traffic: submit it to directories. By submitting your site to directories, people will be able to 'see' you, thus increasing your traffic. Still confused? Here's how it work:

First you submit your blog to sites like dmoz.org or blogcatalog.com. Then your blog will be listed in a directory of your choice. Say you have a blog about blogging tips (yep, it's this blog), you can choose to appear in (for example) Internet > Blogging. Then when people want to look for blogging tips, they go to the Blogging category, and there's your site, ready to attract more traffic. If visitors are interested in your blog description, they might visit it. It's that simple.

Ok, I understand, so where should I be submitting my blog to? Well for a start you might try www.dmoz.org, or www.blogcatalog.com. Note that some sites require you to register first. You can google other directories sites as well, but remember to check their details first (is it a banned site? does it require me to pay?). Just keep in mind that submitting your blog to directories doesn't guarantee 100% traffic, you must work hard for it!

Allow everyone to post in your blog

Is it hard work to maintain all your blog? Or it's just that you want everyone to post their article in your blog, maybe to create a community, etc. Whatever the reason is, this tutorial will show you how to allow ALL (yes, you heard me right, ALL) people, not just predefined folks, to post in your blog, while retaining your authority to moderate them.

Ok, so our no. 1 step is to go to Dashboard > Setting, and choose the 'Email' tab. There you can see the 'Mail-to-Blogger feature. It's usually yourusername.(blank)@blogger.com. Now, fill in the blank with whatever word that suits you; that email address will be used by everyone to mail their post to. So if your username is Jack and you fill the blank with 'posting', any email sent to jack.posting@blogger.com will be automatically posted in your blog. After you fill the blank, hit Save.

The next step you should do is to tell everyone you email address (the one with @blogger.com) so that they can mail their post. You can do this via the Text gadget (read this for more detail http://blogger-newbies.blogspot.com/2008/12/adding-text-to-sidebar.html) or a welcome note, whatever you see fit.

If you want to see the official Blogger tutorial, see this http://help.blogger.com/bin/answer.py?hl=en&answer=41452